Sunday, January 10, 2010

Pork Feast!

After a trip home to Hong Kong, I brought back with me some of my Chinese grandma's cooking skills - which means lots of slow cooked meats, lots of braising and definitely playing with tons of pork. So I started with 4 lbs of pork shoulder, which was surprisingly easy to find at my local Ralphs. I originally wanted pork belly, but they didn't have the cut...pork shoulder is a little leaner, although healthier, it didn't give the same satisfaction.

This is a Northern Chinese pork recipe, adapted from Chinese Food Recipes.

Ingredients:

  • 2 tbsps oil
  • 2 lb pork shoulder, butt or lean sides, cut into 2 inch cubes
  • 3 slices ginger root
  • 4 scallions, cut into 2 inch pieces
  • 3 whole star anise - you can get these in Asian grocery stores such as the 99 Ranch, but you can also substitute this with Chinese Five Spice Powder, the star anise has a licorice kind of flavor, so you add it really just for the oomph. It's not absolutely necessary!
  • 5 tbsps dry sherry - I substituted every tbsp of dry sherry with a tsp of vanilla extract, and 3/4 tsp of water. It's strange, but it seems to work. Any other Chinese cooking wine would work too, or rum, sweet cooking sake...just go with your senses!
  • ¾ cup soy sauce - I also added some dark soy for coloring.
  • 2 tbsps granulated or brown sugar
  • Scallion rings to garnish

Directions:
  • Marinate the pork with the ginger, scallions and a little bit of soy sauce before cooking to boost the flavors.
  • Heat the oil in a pan and add the pork, ginger and scallions. Stir-fry until the pork is lightly browned.
  • Transfer the meat to a saucepan, using a slotted spoon. Reserve the ginger and scallions. Add the anise, sherry, soy sauce, sugar and sufficient water to cover the meat. Bring to the boil, then cover and simmer for 1 hour or until the pork is tender, shaking the pan occasionally to prevent sticking.
  • Arrange the scallions around the edge of a warmed serving plate. Place the ginger in the center and pile the pork on top. Serve hot garnished with a few scallion rings. Then obviously, serve with rice!

Monday, August 3, 2009

KOGI!


Ah. The infamous Korean Taco Truck. It's the Korean taco truck war - our contestants include: Kogi, Bool and Calbi, all claiming to be "authentic Korean BBQ Tacos and Burritos", which I suppose is a contradiction, but I could not care less - if you've been to any of these trucks, you would know what I mean.


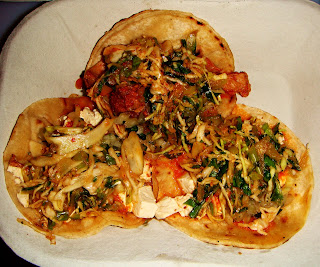
First up, we have the selections of tacos and burritos - spicy pork, chicken, spare ribs and tofu.

Now, the burrito is not your typical burrito. It is filled with meaty goodness, there is definitely no skimping on portions, very easy on the rice, beans and cheese and very very generous on the actual filling. As soon as you bite into that "burrito", a mixture of Asian and Mexican flavors ooze into your mouth. A blend of spare ribs (which is what we ordered) and Asian cabbage, along with sesame sprinkling and some special sauce that tasted like a beautiful blend of soy, teriyaki and stir-fry sauce. I guess it was because there was no rice in the burrito, one person could've had 2 of those, easily.

Now we are onto the Taco. Essentially what is in the burrito, is on the taco. We had the chicken taco, and the tofu taco. We all know about the silky-ness of Korean tofu, now imagine that, served in a soft shelled taco, topped with Asian spices and with a Mexican essence. It was heavenly.

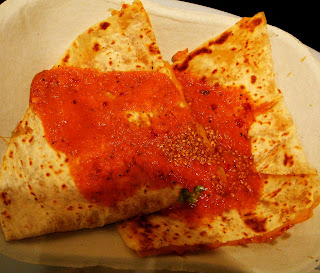
Lastly, we had the kimchi quesadilla. Yep, it is exactly what the name entails. It's a quesadilla - a cheesy blend between two pieces of corn tortilla stuffed with more cheese and some form of filling, which in this case, was kimchi.

I'm not a cheese lover, and too much cheese in my food is a huge no no. I find it overwhelming, and it tends to mask all the flavors in the food, but this was definitely one quesadilla that hit the spot. The intense flavor of the kimchi stood harmonously with the cheese, and to top it all off, a sour and spicy salsa plopped dilgently on the tortilla, making it all so...heavenly.

The only down side was the wait. But guys, it was totally worth it.

Wednesday, July 29, 2009

Dense and Buttery Pound Cake

I've always loved Pound cake - especially the Sara Lee kind. I grew up with that, melon flavored, chocolate swirl, all butter...the options seemed infinite. Yeah...I was a fat kid. Anyway, decided to make pound cake, and LOVED this recipe. Would definitely make it again, but it's not the light and fluffy kind of cake would is why I like it. I hate ordinary cake. I hate the texture. I hate the lightness. I know...it's weird, but the consistency of cake just bothers me.

Butter Pound Cake


Ingredients
  • 1 cup butter
  • 6 eggs
  • 1-1/2 cups white sugar
  • 1-1/2 cups brown sugar
  • 3 cups all-purpose flour
  • 1 pint heavy whipping cream
  • 1 tablespoon vanilla extract (I really like vanilla flavoring, so I doubled that)
  • 2 teaspoons lemon extract (or lemon zest, which is what I used)

The way to do it:
  1. Preheat oven to 325 degrees F (165 degrees C). Grease and flour one 9 or 10 inch tube pan.Or just whatever you have available. I used a 9x9 brownie pan.
  2. With an electric mixer, cream butter and sugar until fluffy. Add eggs, one at a time and mix well.
  3. Introduce the flour, one cup at a time while adding cream a little at a time until all flour and cream is mixed in well.
  4. Add the vanilla and lemon flavoring and blend well. Pour batter into prepared pan.
  5. Bake at 325 degrees F (165 degrees C) for 1-1/2 hours or until center springs back from small amount of pressure. Immediately turn out on cake rack to cool.
  6. Add whatever decoration you want. I ended up just putting bittersweet chocolate pieces in the middle of the cake while it was still hot - so the chocolate would melt into the cake. The most simple decoration I could think of!
It was gone in 2 days. It is quite fatty though. But every slice is a piece of heaven. Especially with the chocolate, it is amazing.

Sunday, July 12, 2009

Heart Shaped Stuffed Crossiants

I was watching Rachael Ray one morning and decided that her recipe was definitely worth trying. It looked easy enough and definitely something that didn't require using my wok! I added a few twists of my own and it worked wonders. Here it is:

Ingredients
  • 2 store-bought bakery croissants
  • 8 slices deli ham (I chose baked honey glazed ham, but any flavor would work! I'm planning on incorporating Spam in it too! It has to very thinly sliced though)
  • 4 slices Swiss cheese (Or any type of cheese really)
  • 2 large plum tomatoes, thinly sliced
  • 4 eggs
  • Salt and ground black pepper
  • Dash of rosemary
  • Dash of red pepper
Preparation:

  1. Preheat oven to 350ºF.
  2. Slice the croissants in half lengthwise. Lay the sliced croissants in a jumbo muffin pan or in a ramekin or in my case, in a heart shaped dessert tray!
  3. Line 2 pieces of ham into the cavities of each half and top them all with a slice of cheese and a few slices of tomato. Crack an egg into each “pocket” and sprinkle them with a little salt and pepper, rosemary and red pepper (go easy on the red pepper!)
  4. Bake until the eggs have set, it took me around 30 minutes, but perhaps it was because of my dessert tray, but 15 - 20 minutes should do for a slightly runny yolk.
They were delicious =)

Update: Redid the recipe, except I used a muffin pan and used some different ingredients. Instead of ham, I used spam, and instead of a full egg, I filled the mini croissants with beaten egg with spring onions. They turned out more like a mini quiche than anything else, but took a lot less effort and time. These would be perfect hors de ordervs!

Wednesday, July 8, 2009

Asian Chips and Dip.

So it's game day. My boys (aka my mid/late 20 year old guy friends who still act like little babies) were coming over. I served up chips and dip, and of course, my own version of chips and dip.

I mean, the concept is there, except my Chips, I mean potstickers, and by dip, I mean sweet and sour +spicy sauce. It's still very satisfying, I swear.

I tend to improvise as I go, but for the filling, here are the main things I use:
  • 2 to 3 cups or 1/4 head of Chinese cabbage (it all depends on how much vegetables you want in your potstickers, so just alter it to your preference)
  • 1 pound lean ground pork
  • 1/4 cup finely chopped green onions, with tops
  • 2 or 3 cloves of garlic, minced
  • 3 tbsp of soy sauce
  • 1 tbsp canola oil (or whatever you have handy)
  • 1 tsp of cornstarch
  • Dash of white pepper
  • Dash of five spice
  • Dash of black pepper
  • Dash of salt
Honestly, any other spices you can think of that would make the filling tasty - it's all up to you! As long as you keep your ingredients Asian...to me, adding fresh rosemary or thyme to the filling is just a little strange. But hey, whatever floats your boat!


The dough:
  • 2 cups all purpose flour
  • 1 cup boiling water
  • Or you can just do what I did the first time round - buy pre made ones from 99 Ranch, or even Ralphs - be careful though, don't get the Won Ton skins, get the potsticker/dumpling skins. Won Ton skins are usually much thinner, and it won't hold the dumpling together when you cook them!
To prepare:

Cut the cabbage into thin strips, make sure they are very finely chopped. Mix with a little salt and set aside for 5 minutes. Then try to pat the cabbage dry with a paper towel, the key thing is to soak up the excess moisture, so be creative, do whatever the hell you need to get the water out!
In a large bowl, mix the cabbage, pork, green onions, garlic, soy sauce, cornstarch, oil, salt, white pepper, five spice, black pepper together. If you added too much salt, just alter your other spices, remember, it's to your desire!

To make the dough...
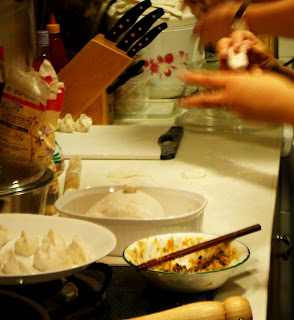
  1. In a bowl, mix the flour and 1 cup boiling water until a soft dough forms. Knead the dough on a lightly flour surface about 5 minutes, or until smooth.
  2. Divide the dough in half. Shape each half into a roll 12 inches long and cut each roll into 1/2-inch slices.
  3. Roll 1 slice of dough into a 3-inch circle and place 1 tablespoon pork mixture in the center of the circle. (These are all approximate measurements, they don't have to be exact!!)
  4. Lift up the edges of the circle and pinch 5 pleats up to create a pouch to encase the mixture. Pinch the top together. Repeat with the remaining slices of dough and filling.
To cook the actual potstickers:

  1. Heat a wok or nonstick skillet until very hot. Add 1 tablespoon vegetable oil, tilting the wok to coat the sides. If using a nonstick skillet, add 1/2 tablespoon vegetable oil. Place as many dumplings as you can comfortably fit in the work (around 12 I suppose) in a single layer and fry on high heat until the skin is slightly brown.
  2. Add 1/2 cup of water and lower heat. Cover and cook for another 5 to 6 minutes, or until the water is absorbed. By then, your dumplings should be slightly crispy and the bottom should be golden brown.
  3. Repeat until all your dumplings are cooked!
  4. Side note : after they are freshly fried, serve them onto a paper towel lined plate so the oil gets absorbed a little, otherwise it can be a little too greasy.
To make the dipping sauce:
  • I use sweet and sour sauce, and then just add some Sriracha in it for a kick
  • OR, you can use soy sauce and sesame oil, or some vinegar if you want that kick. Red wine vinegar would do. The measurements would be something like 1 tsp of seasme oil with 2 tbsp of soy sauce.
Enjoy!

Tuesday, July 7, 2009

Peking town.

I don't know if it's just me, but whenever I travel to China, I can literally smell China as soon as I leave the airport. It's an old musky smell. It doesn't smell horrible, but it definitely is not the smell of freshly baked cookies. So when I revisited Beijing this year, I naturally expected to get a big whiff of that familiar scent as soon as I landed - however, I was pleasantly surprised.

Beijing is a schizophrenic. Its personality changes every couple of months and merely crossing a bridge means seeing a completely different aspect of the city - which is why I loved every minute of it.

Now let's talk food. When I think of Beijing and China in general, I think of its glorious street food. It's the heavenly and/or threatening little snacks along the street, the somewhat unsanitary yet oh-so-delicious delicacies that one can find in late night stalls - and that's what I always thought was the definition of China's food culture.

Us Chinese eat pretty much anything. We think of new and innovative ways to serve "food." Sometimes we do it so that food can party in your mouth, but most of the time we do it because if we don't think of these creative ways, people would never try them. For example. We apparently serve fruit on a skewer. It sounds normal enough on paper, but we actually glaze them in brown sugar and then freeze them, so it becomes more like a fruit Popsicle. (Okay, maybe not brown sugar, but it does look brown and it is sweet, and I honestly don't want to know the truth.)


Then we have the starfish. Simple enough. We just deep fry it so it passes as food, and I guess it would taste good. As Padma from Top Chef once announced, "deep fry anything and it'll taste good, even my big toe!"

Alright..food culture. So like I mentioned, Beijing is a schizo. The city has some serious personalities, so don't let it fool you. I got acquainted with one of its more recently developed faces this time round - high end cuisine. I frequented dimly lit Chinese restaurants featuring fusion food, and along with its delicate presentation and use of flavors, I would've never guessed I was tasting this at the Capital of China.

One of the most impressive places was in the middle of the Financial District. The restaurant, Whampoa Club, was an eye-opener. The decor composed of traditional bird cages hanging from the ceiling, each installed with a light bulb, a downstairs basement where the main dining room was, and private room upstairs decked out with "cloud" light installations. The effort put into renovating this once traditional Chinese household is phenomenal. Now, the food.

There were tasting menus available, something that is unfamiliar in Chinese restaurants. Instead, we usually have what we call "set menus," which are ranked as "crowd pleasers on a limited budget," not as "amazing foodie adventures." We ordered several dishes - four season preserved vegetables, foie gras wrapped with dried, pressed bean curd, steamed tofu in oolong tea and lotus seeds, and the famous Beijing specialty - noodles with fried minced pork paste (see below.)


So what did I gather from this restaurant?

...Try another one! More to come.

Monday, July 6, 2009

Childhood Snickerdoodles

Trial and error gives me - snickerdoodles so soft it's practically eating warm butter out of the oven.


Ingredients
  • 1 2/3 cups white sugar (or brown sugar for a healthier alternative)
  • 2/3 cup butter, softened
  • 1 teaspoon vanilla extract
  • 2 eggs
  • 2 1/2 cups all-purpose flour
  • 1 teaspoon cream of tartar
  • 1/2 teaspoon baking soda
  • 1/4 teaspoon salt
  • 2 tablespoons white sugar
  • 2 teaspoons ground cinnamon

Then all you have to do is...
  1. Preheat oven to 400 degrees F (205 degrees C).
  2. Combine 1 2/3 cups white/brown sugar, butter or margarine, vanilla and eggs. Mix well.
  3. Stir in flour, cream of tartar, baking soda and salt. Blend well.
  4. Shape dough into equal sized balls. Combine 2 tablespoons sugar and 2 teaspoons ground cinnamon. Roll dough in sugar/cinnamon mixture and place at least 2 inches apart on baking sheets.
  5. Bake 8 minutes - no more no less, but do check to see if they look at least solid when the 8 minutes are up, if not, then leave it in there for another minute, but do NOT let it go past 10, otherwise they just become too..generic. Immediately remove from cookie sheets.
Love them.

Update : also made cinnamon streusel muffins with a crunchy, bittersweet chocolate topping. Ahh. Cinnamon overdose is always good.